Features
Features are built-in behaviours that can be customized through their
configurers. Small features can be named as Configuration or Option. When
they only configure an existing behaviour, such as DatabaseConfiguration, it
is a Configuration. When they provide nothing to configure other than
enable/disable, such as UtcOption, it is an Option.
- Audit : Audit your service requests and entities
- Authentication : Learn what alternatives you have in Gazel to provide authentication in your projects
- Authorization : TBD
- Cache : TBD
- Concurrency Limiter : Provides a default concurrency limiter for your backend to perform well under high loads.
- Cors : Allows you to configure Cross-Origin request polices.
- Crypto : Crypto provides a built-in way to encrypt & decrypt sensitive data
- Exception Handling : Gazel has a prebuilt code & message system that converts exceptions into data
- File System : File system gives a nice abstraction for your application to read & write file
- Hashing : TBD
- Localization : TBD
- Logging : TBD
- Message Queue : TBD
- Remote Call : TBD
- Secure Call : TBD
- Transaction : TBD
- Configurations : List of all configuration type features
- Options : List of all option type features
- Implement a new feature : TBD
Below sample illustrates how you can configure a service application;
builder.Services.AddGazelServiceApplication(cfg, ... service: c => ..., audit: c => ..., authentication: c => ..., ...);Each application type have different set of features. To learn more about applications and their features, please have a look at the Architecture section.
In this section we will go through every feature available in Gazel and explain how you can configure them using their configurers.
Audit
Audit feature allows you to audit persistent classes and business services.
To configure this feature you can use Enabled() and Disabled() options.
Default option is Enabled().
audit: c => c.Enabled()audit: c => c.Disabled()Auditing Business Services
Add [Audit] attribute to a business service method to make it auditable. When
a request is made to an audited business service, it will be intercepted and
several calls will be made to your IAuditManager implementation.
[Audit]public async Task RequestWithAudit() => ...;Audit services will require a valid request ID for each service call.
If you want a request ID to be auto generated, you can set RequestId
property to RequestIdMode.Optional.
[Audit(RequestIdMode.Optional)]public async Task RequestWithAudit() => ...;Implementing IAuditManager
For audit attribute to work, you need to have an implementation of
IAuditManager interface in one of your business modules. In this
implementation you can define the behaviour of audit feature.
public class AuditManager : IAuditManager{ void IAuditManager.SaveRequest(Guid requestId, string serviceInstance, string serviceName, string serviceParameters) => ...; void IAuditManager.SaveSuccessfulResponse(Guid requestId, string serviceResponse) => ...; void IAuditManager.SaveFailedResponse(Guid requestId, Exception exception) => ...; int IAuditManager.GetDailyRequestCount(string serviceInstance, string serviceName, Date date) => ...; int IAuditManager.GetMaxDailyRequestCount(string serviceInstance, string serviceName) => ...;}SaveRequest(): During every request interceptor calls theSaveRequest()method. You can use this method to keep a request log.SaveSuccessfulResponse(): You can use this method to save the information of requests with successful response.SaveFailedResponse(): You can use this method to save the information of requests with failed response.GetDailyRequestCount(): Using the request log stored inSaveRequest()you can return the request count for each service.GetMaxDailyRequestCount(): You can use this method to limit number of requests to a business service within a day.
Limiting Daily Request
This feature is enabled by default to allow you to limit number of requests to
a business service within a day. When there is a service request, interceptor
uses GetDailyRequestCount() to get the daily request count and if it exceeds
the maximum daily request amount it will throw an exception.
You can disable this behaviour like below;
audit: c => c.Enabled(limitDailyRequest: false)Auditing Persistent Classes
To audit a persistent class, implement IAuditable interface and add the
AuditInfo type property to your persistent class. AuditInfo is a composite
user type that is mapped to 5 columns, CreateDate, CreateUserId,
ModifyDate, ModifyUserId, ModifyHost.
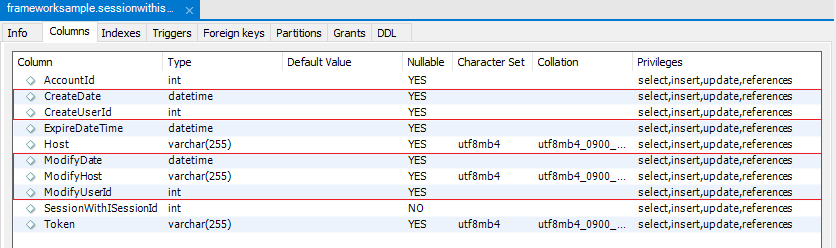
AuditInfo is readonly and values for these 5 properties are managed by this
feature automatically.
CreateDate: The time this record is insertedCreateUserId: Id of the user incontext.Session.Accountwhen this record is insertedModifyDate: The last time this record is updatedModifyUserId: Id of the last user that updates this recordModifyHost: Value ofcontext.Session.Hostwhen this record is inserted or updated
Below is a sample implementation of IAuditable interface;
public class PersistentClass : IAuditable{ private readonly IRepository<PersistentClass> _repository; private readonly IModuleContext _context; protected PersistentClass() { } public PersistentClass(IRepository<PersistentClass> repository, IModuleContext context) { _repository = repository; _context = context; } public virtual int Id { get; protected set; } public virtual AuditInfo AuditInfo { get; protected set; }}When audit is disabled, IAuditable implementations will not cause any
error.
Authentication
In this section, you will learn about how authentication is implemented in Gazel.
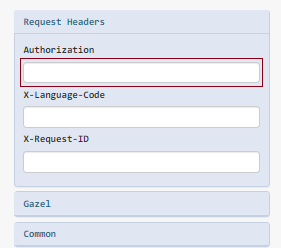
Authentication is enabled by default in Service Application. All requests
from outside of your host project require an token. When you run your
App.Service project, you will see an Authorization text box in request
headers section which configures an HTTP authorization header for every
request.

Below you can see a sequence diagram explaining how gazel interacts with your code through interfaces;
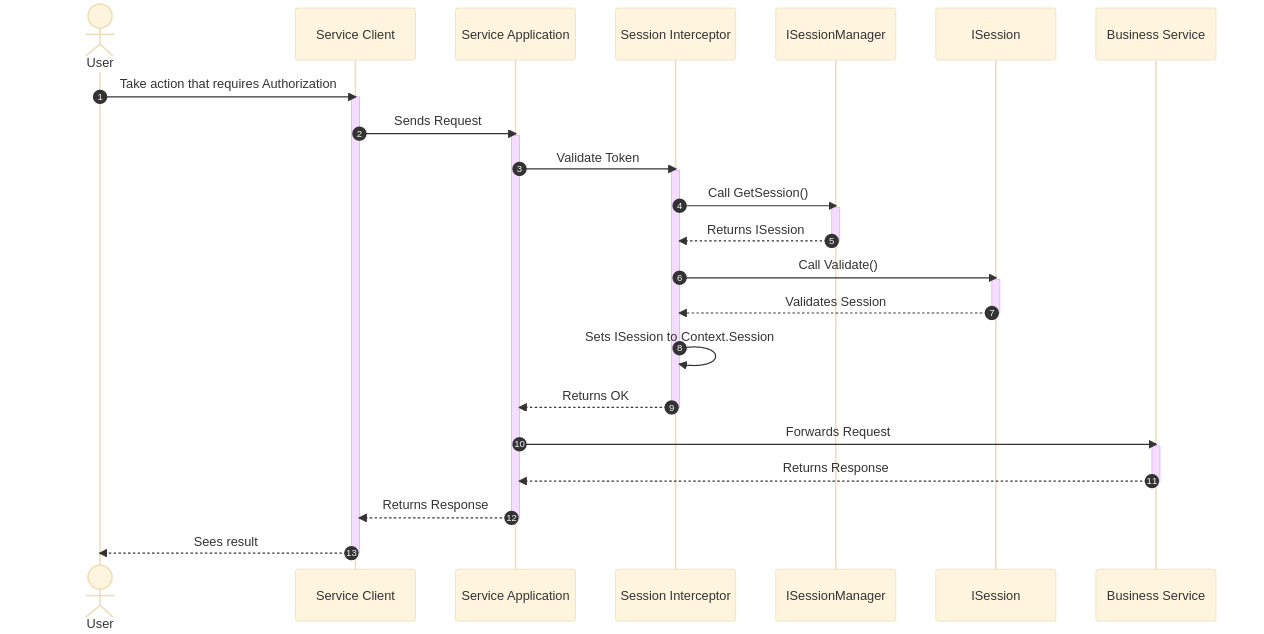
Here you can see that for every request;
- It first calls
GetSession()to retrieve session object - Then it invokes
Validate()to enable validation logic - If everything is ok, it sets your session object to request scope.
ISessionManager interface
When authentication is enabled, Gazel requires an implementation of
ISessionManager interface. Once you implement it in any module, it will be
registered automatically.
ISessionManager is basically responsible for finding an ISession instance
from a given AppToken. An example implementation is as follows;
public class SessionManager : ISessionManager{ ... public ISession GetSession(AppToken appToken) => _context.Query<Sessions>().SingleByAppToken(appToken); ...}If you don't want GetSession method to be public, you can implement
ISessionManager explicitly.
public class SessionManager : ISessionManager{ ... private ISession GetSession(AppToken appToken) { ... } ... ISession ISessionManager.GetSession(AppToken appToken) => GetSession(appToken); ...}ISession interface
Just like a web session, ISession represents a session of a user. Unlike a
web session it is not stored in cookies nor in a file. ISessionManager
creates it before every request and puts it in the request scope. After every
request, session instances are destroyed along with its request.
public interface ISession{ AppToken Token { get; } // The unique identifier of the session string Host { get; } // A text to represent client's host if needed IAccount Account { get; } // The account that this session is attached to void Validate(); // The method that is invoked before every request}Here is an example implementation of ISession interface;
public class Session : ISession{ private readonly IRepository<Session> _repository; private readonly IModuleContext _context; protected Session() { } public Session(IRepository<Session> repository, IModuleContext context) { _repository = repository; _context = context; } public virtual int Id { get; protected set; } public virtual AppToken Token { get; protected set; } public virtual Account Account { get; protected set; } public virtual string Host { get; protected set; } public virtual DateTime ExpireTime { get; protected set; } protected internal virtual Session With(Account account) { Account = account; Token = _context.System.NewAppToken(); Host = _context.Request.Host.ToString(); ExpireTime = _context.System.Now.AddMinutes(30); _repository.Insert(this); return this; } protected virtual void Validate() { if(ExpireTime < _context.System.Now) { throw new AuthenticationRequiredException(); } } //implemented explicitly to return IAccount IAccount ISession.Account => Account; //implemented explicitly to make Validate protected void ISession.Validate() => Validate();}public class Sessions : Query<Session>{ public Sessions(IModuleContext context) : base(context) { } internal Session SingleByAppToken(AppToken appToken) => SingleBy(s => s.AppToken == appToken);}Time of execution for the queued requests may be after the expiry of their
session. Make sure your implementation of GetSession() returns a session
even if it is expired.
IAccount interface
IAccount represents an account in your application.
public interface IAccount{ int Id { get; } // Id of the account string DisplayName { get; } // A text to represent the account // The method that is invoked before every request if authorization is enabled bool HasAccess(IResource resource);}Here is an example implementation of IAccount interface;
public class Account : IAccount{ private readonly IRepository<Account> _repository; private readonly IModuleContext _context; protected Account() { } public Account(IRepository<Account> repository, IModuleContext context) { _repository = repository; _context = context; } public virtual int Id { get; protected set; } public virtual string FullName { get; protected set; } protected internal virtual Account With(string fullName) { FullName = fullName; _repository.Insert(this); return this; } //implemented explicitly to map DisplayName on FullName string IAccount.DisplayName => FullName; //give access to everything for this sample bool IAccount.HasAccess(IResource resource) => true;}public class Accounts : Query<Account> { ... }Accessing User Session
When you finish setting up your authentication mechanism, you can access user
session using IModuleContext.Session property.
public class CompanyManager{ private readonly IModuleContext _context; public CompanyManager(IModuleContext context) { _context = context; } public Company CreateCompany(string name) { return _context.New<Company>().With( name: name, createdBy: _context.Session.Account.DisplayName ); }}Overriding Current Session
You may need to override the session in some specific cases. You can use
IModuleContext.OverrideSession method as shown below.
public class Company{ private readonly IRepository<Company> _repository; private readonly IModuleContext _context; protected Company() { } public Company(IRepository<Company> repository, IModuleContext context) { _repository = repository; _context = context; } protected internal virtual Company With(string name, string address) { //this level uses current session //assume we need an admin session here var adminSession = _context.New<Session>().WithAdminRights(); _context.OverrideSession(adminSession, () => { //here _context.Session returns adminSession //do some admin stuff }); //back to current session Name = name; Address = address; _repository.Insert(this); return this; }}OverrideSession can be used nested. After each OverrideSession block
ends, previous session becomes accessible.
...protected internal virtual Company With(string name, string address){ //this level uses current session _context.OverrideSession(innerSession, () => { //this level uses inner session _context.OverrideSession(nestedSession, () => { //this level uses nested session }); }); //this level uses current session return this;}...Concurrency Limiter
Concurrency limiter provides a way to limit number of requests that are being handled in parallel. To make this happen, Gazel makes use of Microsoft.AspNetCore.ConcurrencyLimiter package.
Configuration
There are two main settings;
- MaxConcurrentRequests: Maximum number of concurrent requests allowed from
outside of the application. Default is
20. Your application will still be able to acceptcontext.Remoteand queue callback requests internally. - RequestQueueLimit: This is the limit of your wait queue. Default is
1000. When exceeded, your application will reject further requests with503 Service Unavailable.
Below is a sample configuration;
builder.Services.AddGazelServiceApplication( ... concurrencyLimiter: c => c.AspNetCore( maxConcurrentRequests: 20, requestQueueLimit: 1000 ), ...);You may want to reduce the number of concurrent requests for development environment. To achieve this you can use settings file;
concurrencyLimiter: c => c.AspNetCore( maxConcurrentRequests: cfg.Setting("ConcurrencyLimiter", 20)),Thread Count Calculation
Number of minimum threads is calculated using given MaxConcurrentRequests
value. For 20 concurrent requests;
- Min threads is set to
40worker,80completion port threads - Max threads is set to
80worker,160completion port threads
This way we ensure that your application handles async call returns, internal remote & system calls and internal queue callbak requests for every request from outside.
Cors
This feature adds Cors extension to your application. In this document,
it states that UseCors call must be placed somewhere between UseRouting and
UseEndpoints calls. With this feature, Gazel ensures this call order.
Applications that use ApiApplication template have this feature enabled and
allows requests from any domain by default.
You may disable this when you don't want your application to allow requests from other domains;
cors: c => c.Disabled()
Adding Default Policy
You can add a custom policy as default;
cors: c => c.Enabled( o => o.AddDefaultPolicy(policy => policy.WithOrigins("http://example.com")))Adding Named Policies
You may also add multiple policies, so that they can be selected later from settings;
cors: c => c.Enabled( o => { o.AddPolicy("Production", policy => policy.WithOrigins(cfg.Setting("Cors.Production"))); o.AddPolicy("Staging", policy => policy.WithOrigins(cfg.Setting("Cors.Staging"))); }, cfg.Setting("Cors.PolicyName"))If you add a policy with a name, you need to specify that name as a second parameter to make it use that policy.
For more information about how to add policy to cors you can refer to Microsoft Cors Document .
Crypto
Crypto feature provides a basic encryption/decryption capability to store sensitive data in configuration file or database. It also provides an API to be used in accepting an input in a more secure way. Let's dive in to see how you can use this feature to make your back-end functionality more secure.
Crypto API
This API consists of two main types ICryptographer and EncryptedString
providing ways to encrypt/decrypt data and represent encrypted data,
respectively.
ICryptographer interface
This interface is a gateway facade to an underlying security mechanism provided
by .NET. Behind the scenes, this interface uses a X.509 certificate with a an
public / private key pair (for more information see X.509 and RSA ).
This way you can make use of asymmetric encryption where needed. There are two
types of usage; Encrypt / Decrypt and Sign / Verify.
Encrypt & Decrypt
First and most basic type of usage is to encrypt data using the public key, and decrypt it using the private key. For example, you can use this to encrypt sensitive data to save it in somewhere unsafe so that you can retrieve and decrypt it later.
public class CryptoManager{ private readonly ICryptographer _crypto; public FileManager(ICryptographer crypto) => _crypto = crypto; public Binary GetSensitiveData() { var sensitive = "something to hide".ToUtf8Binary(); return _crypto.Encrypt(sensitive); } public bool CheckSensitiveData(Binary binary) { var sensitive = _crypto.Decrypt(binary).ToUtf8String(); return sensitive == "something to hide"; }}You may share your public key with the outside world so that anyone with this key can encrypt and send a sensitive information which can only be decrypted by your back-end system.
ICryptographer also has helper methods to make string conversions easier.
...public string GetSensitiveData(){ // returns base64 representation of encrypted binary return _crypto.Encrypt("something to hide");}public bool CheckSensitiveData(string encryptedSensitive){ return _crypto.DecryptUnsecure(encryptedSensitive) == "something to hide";}...Above code uses DecryptUnsecure method, which returns a regular string
object. There is also a Decrypt method which returns a SecureString.
SecureString is a class that encrypts given string with a symmetric key and
stores in memory so that a it is safely kept in memory.
...public bool CheckSensitiveData(string encryptedSensitive){ var sensitive = _crypto.Decrypt(encryptedSensitive); return sensitive.Decrypt() == "something to hide";}...Notice that data is decrypted twice; first time it is done by using your X.509
certificate, second time it is done on SecureString object by using a
symmetric key that .NET generates.
This code is for demonstration purposes only. In a real life case you might
keep your sensitive data in a SecureString object, and pass it to a method
as a parameter or store in a property. This way it will be less likely to be
exposed. Decrypt a SecureString right before you use it in your code.
Sign & Verify
Sign & verify is like the opposite usage of encrypt & decrypt. Decryption can only happen on the side that has the private key, which is back-end side in this case. So encryption is made with a public key, decryption is made with the corresponding private key.
On the contrary, here, signing is done using a private key, and verifying is done using its corresponding public key. So in this usage it's not about hiding information from outside, rather it's about signing data to make it possible for retrievers to verify that data is signed by, thus coming from, the trusted source.
...public string[] GetSignedData(){ var sensitive = "something to be signed"; var hasher = HashAlgorithm.Create("SHA256"); hasher.ComputeHash(sensitive.ToUtf8Binary()); // Signing is done using the private key var signature = _crypto.Sign(hasher.Hash, "SHA256"); return new[] { sensitive, signature };}public bool Verify(string[] signedData){ var sensitive = signedData[0]; var signature = signedData[1]; var hasher = HashAlgorithm.Create("SHA256"); hasher.ComputeHash(sensitive.ToUtf8Binary()); // Verification is done with the public key return _crypto.Verify(hasher.Hash, "SHA256", signature);}...Sign and verify is used in Secure Call feature, where response values are used to compute a hash to be signed so that client can verify and trust response.
EncryptedString struct
This struct acts like a wrapper type for SecureString class from .NET, (see
SecureString ). It conforms to the parseable value type convention just
like rest of the value types from Gazel.Primitives package. There are three ways to
create an EncryptedString instance.
Parsemethod, when you have a plain string object;var encrypted = EncryptedString.Parse("something sensitive");FromEncryptedmethod, when you have an encrypted value;
Second parameter isvar encrypted = EncryptedString.FromEncrypted(encryptedBinary, b => _crypto.DecryptUnsecure(b));decryptDelegatein caseEncryptedString.DecryptorEncrypted.ToString()method are called on this instance. Without a decrypt delegate it would not be able to decrpyt its value.- Use a
SecureStringinstance. You can cast it to anEncryptedString;
or use constructor;var encrypted = (EncryptedString)secureString;var encrypted = new EncryptedString(secureString);
This struct either stores given encrypted binary value, or a secure string instance so that sensitive information is securly kept in memory. You may read How secure is SecureString section from .NET documentation to learn more.
Mapping to a Table Column
You can map EncryptedString just like any other value type.
public class Secret{ ... public virtual int Id { get; protected set; } public virtual string Name { get; protected set; } public virtual EncryptedString Value { get; protected set; } ...}If you intend to use an encrypted string property, please read below information carefully;
- Only encrypted binary value is stored in database so that nobody can see the value without a proper certificate. So it is highly recommended for you to use a different certificate for each environment (Development, Production etc.), and never expose private key of your Production certificate to the people that have access to your production database.
- Value is not decrypted until you explicitly call
DecryptorToString. This is because decryption is costly and retrieving a list of persistent objects should not decrypt automatically.DataAccessLayerusesFromEncryptedmethod to createEncryptedStringinstances when data is retrieved from database. - Since
EncryptedStringis expected to store sensitive data, it will never appear in a response directly. So you don't need to make itprotected internalor[Internal].
Notice how Gazel does not decrypt an EncryptedString in any case. So if
your business logic somehow requires an encrypted string to be decrypted,
remember that you will need to either call ToString() or Decrypt() at
some point.
Below is an example of how you can generate and store a sensitive information;
public class Secret{ ... protected internal SecretToken With(string name) { Name = name; Value = EncryptedString.Parse($"{system.NewGuid()}"); _repository.Insert(this); return this; } ...}As a Service Parameter
You may use EncryptedString as a service parameter just like any other value
type. Below you can see a simple example;
public class Secret{ ... public virtual void UpdateValue(EncryptedString value) { Value = value; } ...}Beware that this does not encrypt the sensitive data when transferring
from client to your back-end. You can already achieve this through an HTTPS
connection. EncryptedString only helps you to secure this data using a
symmetric encryption when stored in memory and an asymmetric encryption when
stored in database.
Although EncryptedString is accepted as a service parameter, a method that
returns EncryptedString cannot be registered as a business service (a.k.a.
operation), and cannot be called from outside. And also, a property with its
type as EncryptedString cannot be registered in service layer as a business
data as well.
When a service one of the parameters of a service is EncryptedString, that
service is marked as sensitive and does not log its parameter and
response data.
Reading from Settings
This feature allows you to read an encrypted string from settings using
GetEncryptedString method of ICryptographer interface. Let's revisit the
previous example from ICryptographer Interface
section.
public Binary GetSensitiveData(){ var sensitive = "something to hide".ToUtf8Binary(); return _crypto.Encrypt(sensitive);}Here you can see that sensitive information is exposed as a constant string, which makes this sensitive information available to anyone who has access to this code. To prevent this we can read it from settings.
public Binary GetSensitiveData(){ var sensitive = _crypto.GetEncryptedString("Sensitive"); return sensitive.EncryptedValue;}Encrypt a sensitive data using your certificate and put its encrypted value to configuration file in base64 format. This way only someone with private key will be able to know actual value of sensitive data.
This method first looks for a value with given key. If value does not exist,
it will look for its decrypted version under "Sensitive.Decrypted" key, so
below file also works;
{ "Sensitive": { "Decrypted": "something to hide" }}This can be handy in development environemnt, when sensitive data is sensitive only in production and you have some other not sensitive value in development.
Configuration
There are three ways to load a certificate, X509Store,
X509CertificateFromP12File and X509CertificateFromPem. There is also a
fourth, and the default, AutoResolve option which uses configuration file to
decide which one to use.
X509Store
This option uses certificate store of operating system to load a certificate. If you use this option you will have to install your certificate to every OS that will run your back-end system.
Currently this option is only supported in Windows operating systems.
You can choose this option as follows;
crypto: c => c.X509Store()X509Store requires storeName and storeLocation information to know in
which store to look for a certificate. It also requires an extra search
parameter to locate certificate in the specified store. By default this option
looks for StoreName, StoreLocation and SubjectName in configuration file
under Gazel.Certificate section like the following;
{ "Gazel": { "Certificate": { "StoreName": "TrustedPublisher", "StoreLocation": "LocalComputer", "SubjectName": "Gazel" } }}If no configuration was given, storeName defaults to TrustedPublisher,
storeLocation defaults to LocalComputer. Possible values to these
parameters can be found at StoreName and StoreLocation pages.
You can override this configuration directly from configurer as well;
crypto: c => c.X509Store( storeName: StoreName.TrustedPublisher, storeLocation: StoreLocation.LocalMachine)For the extra search parameter, you may give any of search criteria defined in
X509FindType . All values of X509FindType enum starts with FindBy
prefix, which is removed in configuration keys. For example if you use
FindByIssuerName and use Inventiv as its value, you should change
configuration as follows;
{ "Gazel": { "Certificate": { "StoreName": "TrustedPublisher", "StoreLocation": "LocalComputer", "IssuerName": "Inventiv" } }}You cannot override this extra search parameter from configurer like you do
it with storeName and storeLocation parameters. It has to be specified
from configuration file.
X509CertificateFromP12File
This option enables you to load a PKCS #12 certificate from .p12 file
using configured IFileSystem instance (see File System ) and
suitable in non-Windows operating systems. Below code enables this option;
crypto: c => c.X509CertificateFromP12File()It requires path and passwordFile information to load a certificate from
given path and use private key with the password specified in given password
file. By default it looks for Path and PasswordFile keys in configuration
under Gazel.Certificate section as follows;
{ "Gazel": { "Certificate": { "Path": "Gazel.p12", "PasswordFile": ".CERTPASS" } }}When configuration does not contain these keys, path defaults to Gazel.p12
and passwordFile defaults to .CERTPASS.
Private key password is asked to be in a separate file so that you can
include a certificate, such as a development certificate in your code
repository, but put .CERTPASS file in .gitignore. This will protect your
certificate even if you include it in your repository.
You may override these configurations to be set directly from configurer;
crypto: c => c.X509CertificateFromP12File( path: "Inventiv.p12", passwordFile: ".Inventiv.p12.pass")We suggest you to use a hidden file for password files. In a unix-like operating systems when a file starts with a dot, it means it is a hidden file (see Dot file ). In Windows operating systems you explicitly need to set a file as hidden.
X509CertificateFromPem
This option enables you to give certificate information directly from configuration file or configurer. Gazel uses this option to register a stub certificate during unit test runs. Below code enables this option;
crypto: c => c.X509CertificateFromPem()This option requires certPem, keyPem and passwordFile information to be
used. By default it looks for these information configuration file using
CertPem, KeyPem and PasswordFile keys, respectively, under
Gazel.Certificate section. Certificate contents usually start with
-----BEGIN CERTIFICATE----- and has new lines in them. To handle this you
need to use \n character in json string, an example is as follows;
{ "Gazel": { "Certificate": { "CertPem": "-----BEGIN CERTIFICATE-----\nMIIC7zCCAdegAwIBAgIQhaAixfnuiK5HBHMC+kz4zTANBgkqhkiG9w0BAQsFADAQ\nMQ4wDAYDVQQDEwVHYXplbDAeFw0xODAxMTcxMDMxMDFaFw0zOTEyMzEyMzU5NTla...", "KeyPem": "-----BEGIN ENCRYPTED PRIVATE KEY-----\nMIIFHDBOBgkqhkiG9w0BBQ0wQTApBgkqhkiG9w0BBQwwHAQIG7xEAxkSK6gCAggA\nMAwGCCqGSIb3DQIJBQAwFAYIKoZIhvcNAwcECEmeebmmTgQsBIIEyJGTsjMc2869...", "PasswordFile": ".CERTPASS" } }}Gazel does not have a default certificate so certPem and keyPem do not have
a default. Just like previous option, passwordFile defaults to .CERTPASS.
crypto: c => c.X509CertificateFromPem( certPem: @"-----BEGIN CERTIFICATE-----MIIC7zCCAdegAwIBAgIQhaAixfnuiK5HBHMC+kz4zTANBgkqhkiG9w0BAQsFADAQMQ4wDAYDVQQDEwVHYXplbDAeFw0xODAxMTcxMDMxMDFaFw0zOTEyMzEyMzU5NTla...-----END CERTIFICATE-----", keyPem: @"-----BEGIN ENCRYPTED PRIVATE KEY-----MIIFHDBOBgkqhkiG9w0BBQ0wQTApBgkqhkiG9w0BBQwwHAQIG7xEAxkSK6gCAggAMAwGCCqGSIb3DQIJBQAwFAYIKoZIhvcNAwcECEmeebmmTgQsBIIEyJGTsjMc2869...-----END ENCRYPTED PRIVATE KEY-----", passwordFile: ".CERTIFICATE_PASSWORD")Above example illustrates how you can override default configuratiion directly from configurer.
Configuring certificate directly from configurer is not recommended for
production code, because it may lead you to include production certificate
directly in source code. Production certificates are strongly recommended
not to be in your repository. If you choose X509CertificateFromPem
option, make sure you load certificate from configuration file and you don't
include Gazel.Certificate section of your production environment
configuration in your repository.
AutoResolve
This option is the default option for crypto feature and enables you to configure crypto feature completely through configuration file. You don't have to select this option explicitly but you can still choose to do it as shown below;
crypto: c => c.AutoResolve()It does not accept any parameters. Default behaviour is to use X509Store on
Windows and X509CertificateFromP12File on unix-like operating systems. To
explicitly specify which option to use, you can add Type key under
Gazel.Certificate section;
{ "Gazel": { "Certificate": { "Type": "X509Store" } }}Option names are the same as previous sections; X509Store,
X509CertificateFromP12File and X509CertificateFromPem. Each option expects
its own keys as explained in previous sections. Below example uses store option
and specifies certificate information under same conffiguration section;
{ "Gazel": { "Certificate": { "Type": "X509Store", "SubjectName": "Inventiv" } }}Combining options is also possible. Assume some people use Windows for development and some use unix-like systems. Below example will be sufficient to configure both at one place;
{ "Gazel": { "Certificate": { "SubjectName": "Inventiv", "Path": "Inventiv.p12", } }}This configuration will look for a certificate with subject name Inventiv
in trusted publisher and local machine for Windows operating systems, and
will look for a certificate Inventiv.p12 in file system for unix-like
operating systems.
Configuring certificates for a Gazel CLI process
Gazel CLI allows you to generate a schema from a bin directory. When you use
this option Gazel CLI will render given bin directory including your
configuration files and configurers in your Program.cs. This means that if
you use crypto feature, especially in configuration files, it might require a
correct configuration for crypto feature as well.
Gazel CLI uses Development for environment by default. However if you face a
problem while generating schema, code or dll because of encryption problems,
you can make use of --environment option to set environment during Gazel CLI
process.
g schemagen bin/net6.0/Debug --environment GazelCLIThis, for example, sets environment to GazelCLI so that you can create a
appsettings.GazelCLI.json file and specify your certificate option in this
configuration under Gazel.Certificate section.
Exception Handling
Exception handling feature provides a way for your services to respond with a
code and a message for every request. To set an error code and message in your
response you simply implement an exception class that extends
ServiceException and throw an instance of that exception class in your
business code.
But before you start writing exception classes and use them right away, we want to describe result code system in Gazel.
Result Codes
Result codes are reserved numbers starting from 0 to 99999 that will
represent a response status of a service in your system. There are 5 types of
result codes;
| Type | Abbr. | Code Range |
|---|---|---|
| Success | - | 0 |
| Info | INF | 1 - 10000 |
| Warning | WAR | 10001 - 20000 |
| Error | ERR | 20001 - 90000 |
| Fatal | - | 99999 |
These types are represented by ResultCodeType enum in Gazel.Service
namespace.
Result Code Blocks
There are two main concerns about result codes that need to be addressed;
- To be unique and static so that they can be documented
- To be organized so that they are easily used
There are 10K info, 10K warning codes and 70K error codes. To organize
these numbers without breaking uniqueness you may split those codes into
blocks, so that for every result code block there are 100 info, 100 warning
and 700 error codes. Here is the table for result codes organized using
result code blocks;
| Block Index | Info | Warning | Error |
|---|---|---|---|
| #0 (Reserved) | 1 - 100 | 10001 - 10100 | 20001 - 20700 |
| #1 | 101 - 200 | 10101 - 10200 | 20701 - 21400 |
| #2 | 201 - 300 | 10201 - 10300 | 21401 - 22100 |
| ... | |||
| #99 | 9901 - 10000 | 19901 - 20000 | 89301 - 90000 |
Block 0 is reserved for built-in result codes such as 20001 - Authentication Required etc. See below section for all
built-in result codes of Gazel
To create a result code block extend ResultCodeBlocks class like this;
public class ResultCodes : ResultCodeBlocks{ public static readonly ResultCodeBlock MyBlock = CreateBlock(1, "MyBlock");}You will use this class potentially from every business module, so it's better for this to be included in the most base business module.
Now that we've created a block called MyBlock at index 1, let's use this
block to create a unique result code within its code ranges;
using static MyProduct.ResultCodes;MyBlock.Info(0); // 101MyBlock.Info(10); // 111MyBlock.Warn(0); // 10101MyBlock.Warn(10); // 10111MyBlock.Err(0); // 20701MyBlock.Err(10); // 20711You may use one block per business module in your project. This way, errors will be organized by the domain they belong to.
Response Status
Response status is managed by Status property of IResponse to which you can
access through IModuleContext.
_context.Response.StatusType of this property is IResponseStatus, which is the interface to represent
all response statuses. There are 3 base classes that implements this interface;
ServiceInformationfor informationServiceWarningfor warningsServiceExceptionfor errors
In service applications, ServiceInformation and ServiceWarning are
included in response headers along with the successful response body.
However, ServiceException is returned directly in the response body.
Implementing a response status
For every message and status extend one of the response status base classes with a proper result code.
using static MyProduct.ResultCodes;...public static class MyExceptions{ public class ThisIsWrong : ServiceException { public ThisIsWrong() : base(MyBlock.Err(0)) { } }}public static class MyWarnings{ public class YouAreWarned : ServiceWarning { public YouAreWarned() : base(MyBlock.Warn(0)) { } }}Here you can see that we've used a result code block MyBlock to give a
proper warning code.
Throwing exceptions
When you implement an exception class that extends ServiceException you may
throw it just like any .NET exception;
using static MyProduct.MyExceptions;...public class MyManager{ public void GiveMeError() { throw new ThisIsWrong(); }}Exception handling mechanism catches this exception and automatically sets it as a response status.
When you throw an exception that is not a ServiceException, then it will be
treated as a fatal error with result code 99999. To handle other exceptions
than ServiceException you need to implement a custom exception handler as
mentioned in below section .
You may still catch this exception from your business code so that exception handling mechanism is not triggered.
Setting response status
You may also directly set _context.Response.Status property with an
IResponseStatus instance. Below is an example of setting status to a warning;
using static MyProduct.MyWarnings;...public class MyManager{ private readonly IModuleContext _context; public MyManager(IModuleContext context) => _context = context; public void GiveMeStatus() { _context.Response.Status = new YouAreWarned(); }}Log Levels
- Handled exceptions, responses with error codes, are logged in Warning level.
- Unhandled exceptions, responses with fatal code , are logged in Error level.
- Other statuses are not logged separately.
You may configure logging to only include error logs in production, so that you can monitor unhandled errors in the production code.
Localizing messages
Every result code should have a corresponding message in localization.
Exception handling uses ILocalizer to retrieve message format using a key
with type and code such as ERR-20001, WAR-10001. Once message format is
retrieved, it is formatted using message parameters in response status object.
Let's say you defined another exception in MyBlock;
...public class RequiredParameter : ServiceException{ public RequiredParameter(string parameterName) : base(MyBlock.Err(1), parameterName) { }}This would have a localization key ERR-20702.
Assume your localization has a message like this;
{ "ERR-20702": "Parameter is required: '{0}'"}When you throw this exception;
public void CreateEmployee(string ssid){ if(string.IsNullOrWhitespace(ssid)) { throw new RequiredParameter(nameof(ssid)); } ...}You will send a response with code 20702 and message;
Parameter is required: 'ssid'Including extra data
ServiceException class has a special property called ExtraData to enable you
to include extra data along with code and message so that client applications can
use this information to handle some business logic in exception case.
Assume you have a Withdraw service that withdraws money from an account. You
may return current balance in extra data, when withdraw operation throws
insufficient balance exception so that client application can use it to provide
some further functionality.
Service applications include this informations in X-Extra-Data response
header. Other applications, e.g. api application, may not return this
information.
Built-in Errors
Below you can see built-in exceptions and their defined error codes;
| Error Code | Error Type | HTTP Status Code1 |
|---|---|---|
| 20001 | AuthenticationRequiredException | 401 |
| 20002 | FormatException | |
| 20003 | PermissionDeniedException | 403 |
| 20004 | FormatException<CreditCardNumber> | |
| 20005 | UriFormatException | |
| 20006 | ObjectNotFoundException | 404 |
| 20007 | FormatException<AppToken> | |
| 20008 | FormatException<CardNumber> | |
| 20009 | FormatException<CurrencyCode> | |
| 20010 | FormatException<DateRange> | |
| 20011 | FormatException<Date> | |
| 20012 | FormatException<Email> | |
| 20013 | FormatException<MoneyRange> | |
| 20014 | FormatException<Money> | |
| 20015 | FormatException<Tckn> | |
| 20016 | FormatException<TimeRange> | |
| 20017 | FormatException<Time> | |
| 20018 | FormatException<Vkn> | |
| 20019 | InvalidEnumArgumentException | |
| 20020 | RangeException<DateRange> | |
| 20021 | RangeException<MoneyRange> | |
| 20022 | RangeException<TimeRange> | |
| 20023 | FormatException<TriState> | |
| 20024 | InvalidCurrencyException | |
| 20025 | FormatException<Rate> | |
| 20026 | FormatException<Timestamp> | |
| 20027 | FormatException<DateTime> | |
| 20028 | FormatException<DateTimeRange> | |
| 20029 | RangeException<DateTimeRange> | |
| 20030 | FormatException<Guid> | |
| 20031 | RequestIdRequiredException | |
| 20032 | FormatException<Binary> | |
| 20033 | MaxDailyRequestCountExceededException | |
| 20034 | FormatException<Iban> | |
| 20035 | FormatException<Geoloc> | |
| 20036 | FormatException<TimeSpan> | |
| 20037 | FormatException<VknOrTckn> | |
| 20038 | FormatException<MimeType> | |
| 20039 | FormatException<CountryCode> | |
| 20040 | NotImplementedException | 501 2 |
| 20041 | FormatException<Password> | |
| 20042 | FormatException<EncryptedString> | |
| 20201 | FrameworkExceptions.Remote | |
| 20202 | FrameworkExceptions.InvalidSign |
Information and Warnings
| Result Code | Response Status |
|---|---|
| 1 | FrameworkInformations.Remote |
| 10001 | FrameworkWarnings.ObsoleteServiceCalled |
| 10002 | FrameworkWarnings.Remote |
| 10003 | FrameworkWarnings.GivenLanguageCodeIsNotSupported |
Customization
Exception handling mechanism is a core feature of Gazel framework. You cannot change the underlying mechanism nor you cannot disable it. However, you can extend it to provide additional exception handlers.
Creating a custom handler
Exception handling is done through IExceptionHandler interface. If you want
to provide a custom mechanism to handle errors, you must implement this
interface and register it to IKernel.
When an exception is thrown, exception handling feature loops through all
exception handlers to find a way to convert the exception into
ServiceException. If it can, then it means exception is handled with an error
code, if it cannot, then it means it is an unhandled exception with the fatal
code.
Below is an example of a custom exception handler for ArgumentException;
public class MyHandler : IExceptionHandler{ public bool Handles(Exception ex) => ex is ArgumentException; public ServiceException Handle(Exception ex) => new ServiceException(90001) ExceptionInfo GetExceptionInfo(int resultCode) => resultCode == 90001 ? new ExceptionInfo(typeof(ArgumentException)) : null;}If you implement a handler inside a module project, it will be automatically registered to kernel so that exception handling can use your custom handler.
Footnotes
File System
File system feature basically enables you to read/write file content from/to a file storage.
IFileSystem interface
When an application has this feature, you can directly inject IFileSystem interface
into your business objects. Below is a simple example;
public class FileManager{ private readonly IFileSystem _file; public FileManager(IFileSystem file) => _file = file; public await Task<Binary> FetchContent(string path) { return await _file.ReadAsync(path); }}Configuration
Gazel has a built-in implementation that uses local storage.
builder.Services.AddGazelServiceApplication( ... fileSystem: c => c.Local(rootPath: "files"), ...);When rootPath is given, all files will be stored under this folder. You might
pass an absolute path as well.
c => c.Local(rootPath: "/absolute-path"),Local storage makes sense for development environment. You may use a network path by giving an absolute path as well.
Customization
When you want to store files in a different type of storage, you can implement
IFileSystem interface and register it using Custom configurer in
FileSystemConfigurer.
Assume you've made an S3 implementation of file system interface, you can register it as below;
c => c.Custom<S3FileSystem>()If your implementation depends on some configuration, write a settings class, register it to the IoC and inject it to the file system implementation.
For above example, write a class named S3Settings and inject it into
S3FileSystem class, and then register S3Settings to the kernel.
Configurations
Here you can find how to configure small features, Configurations. When configuring an application you can always check which ones are available from the optional parameters.
Every sample code in this section is in the same format as service feature
configuration shown below;
service: c => c.Routine( serviceUrlBase: ServiceUrl.Localhost(7028))Examples will only include configuration line to avoid repetitive samples like below;
builder.Services.AddGazelServiceApplication(cfg, ... service: c => c.Routine( serviceUrlBase: ServiceUrl.Localhost(7028) ) ...);Application Assemblies
You may change which assemblies are used for an application via this
configuration. By default Gazel loads all assemblies starting with the root
namespace of your entry assembly. Assume your Program.cs is in a project
named MyCompany.MyComponent.App.Service, then the root namespace is
MyCompany.
Each application configurer has a configuration named applicationAssemblies
which provides Assemblies instance as a parameter and expects
List<Assembly> as a result. Below you can find default configuration;
applicationAssemblies: c => c.AllThere are several ways to determine which assemblies to use;
Filtering All
You can directly filter out unwanted assemblies returned by All property.
applicationAssemblies: c => c.All.Where(predicate: a => !a.FullName.Contains(value: "Exclude")).ToList()Find By Namespace
There is a method on Assemblies class called Find that takes a namespace
predicate as a parameter;
applicationAssemblies: c => c.Find(namespaceFilter: ns => ns.StartsWith(value: "MyCompany"))Find By Regex
You can also provide a namespace regex;
applicationAssemblies: c => c.Find(namespaceRegex: "^MyCompany.*$")Find By AssemblyType
You can make use of AssemblyType class.
applicationAssemblies: c => c.Find(type: AssemblyType.Module)c => c.Find(type: AssemblyType.All) is equivalent to c => c.All
AssemblyType uses root namespace of your project that is resolved
automatically. You can access your root namespace programmatically via
AssemblyType.Root or Config.RootNamespace.
Application Session
ApplicationSessionConfiguration allows you to provide a token for a middle
application (such as Gateway Application) to be used when sending requests to
its backing application (such as Service Application). When there is a need
for your application to authenticate its requests to the other application
before a user session is established you can use this configuration.
You can find this configuration under applicationSession: parameter and
provide an AppToken.
applicationSession: c => c.Use(token: cfg.Setting<AppToken>("ApplicationSession.Token"))Or you can leave your application session token empty by using
UseEmptyToken().
applicationSession: c => c.UseEmptyToken()Default configuration uses UseEmptyToken().
Business Logic
Using BusinessLogicConfiguration you can configure Routine's
developmentMode and maxFetchDepth options.
businessLogic: c => c.Routine( developmentMode: builder.Environment.IsDevelopment(), // defaults to false maxFetchDepth: 10 // defaults to 10)MaxFetchDepth is a parameter that limits service layer during json
serialization from going through all the relations to prevent a stack
overflow in case of a circular relation. This does NOT configure
NHibernate's eager fetch / lazy load mechanism.
There is also an extra includeComponentNameInModuleName: option which enables
your application to use the component part of your module project as well as
its module name. To use this option your module projects must be named in this
convention: <Company>.<Component>.Module.<ModuleName>.
businessLogic: c => c.Routine( includeComponentNameInModuleName: true // defaults to false)To give an example, if you have a module project named
Inventiv.Sample.Module.Todo, name of this module in service layer is Todo
by default. If you set this option to true, module name in service layer will
be Sample.Todo. It is useful when you have a large enough project with more
than one component.
Command Line
Allows you to configure which assembly to use when searching for command classes. You can use AssemblyType (similar to Application Assemblies ) for this configuration.
commandLine: c => c.CommandLineParser(commandAssembly: AssemblyType.All),Default configurations uses AssemblyType.App, so it expects command classes
to be directly in the app project. App project names follow this convention:
<Company>.<Component>.App.<AppName>.
For more information visit Command Line Layer .
Database
TBD
Gateway
Configures Gateway Layer . Serves
internal business services under given rootPath. You can also restrict access
to business services by using allow and deny regex patterns.
// This sample configuration allows all services and denies nothing.// Example url: http://localhost:5000/gw/{module}.{entity/query}/{business}gateway: c => c.Routine( rootPath: "gw", allow: ".*", deny: "^!$")Default configuration serves under /, the root url of your application, and
allows every business service with no restriction.
Http Header
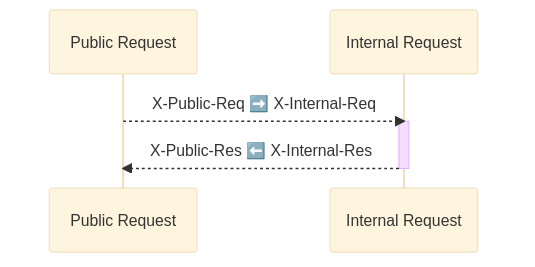
HttpHeader configuration lets you expose custom headers in your public application and map them to the headers of your internal business services. Exposed headers are called public headers. Once mapped for every request they will be forwarded to the business services using their internal header name. Internal response headers will be mapped back to their corresponding public header as well.
This configuration is an example for creating a custom request and response headers;
httpHeader: c => c.Custom(h => h .RequestHeader( publicHeaderName: "X-Public-Req", internalHeader: "X-Internal-Req" ) .ResponseHeader( publicHeaderName: "X-Public-Res", internalHeader: "X-Internal-Res" ))Below diagram illustrates mapping flow of this example;
You may also manipulate header value via a conversion function. Adding conversion functions to configuration from previous example;
httpHeader: c => c.Custom(h => h .RequestHeader( publicHeaderName: "X-Public-Req", internalHeader: "X-Internal-Req", conversionFunc: public => public.ToUpperInvariant() )s .ResponseHeader( publicHeaderName: "X-Public-Res", internalHeader: "X-Internal-Res", conversionFunc: internal => internal.ToLowerInvariant() ))Notice that conversion function in request accepts public header value as its parameter and returns internal header value, whereas in response it accepts the internal response header value.
Below is another example to illustrate what you can achieve using this configuration;
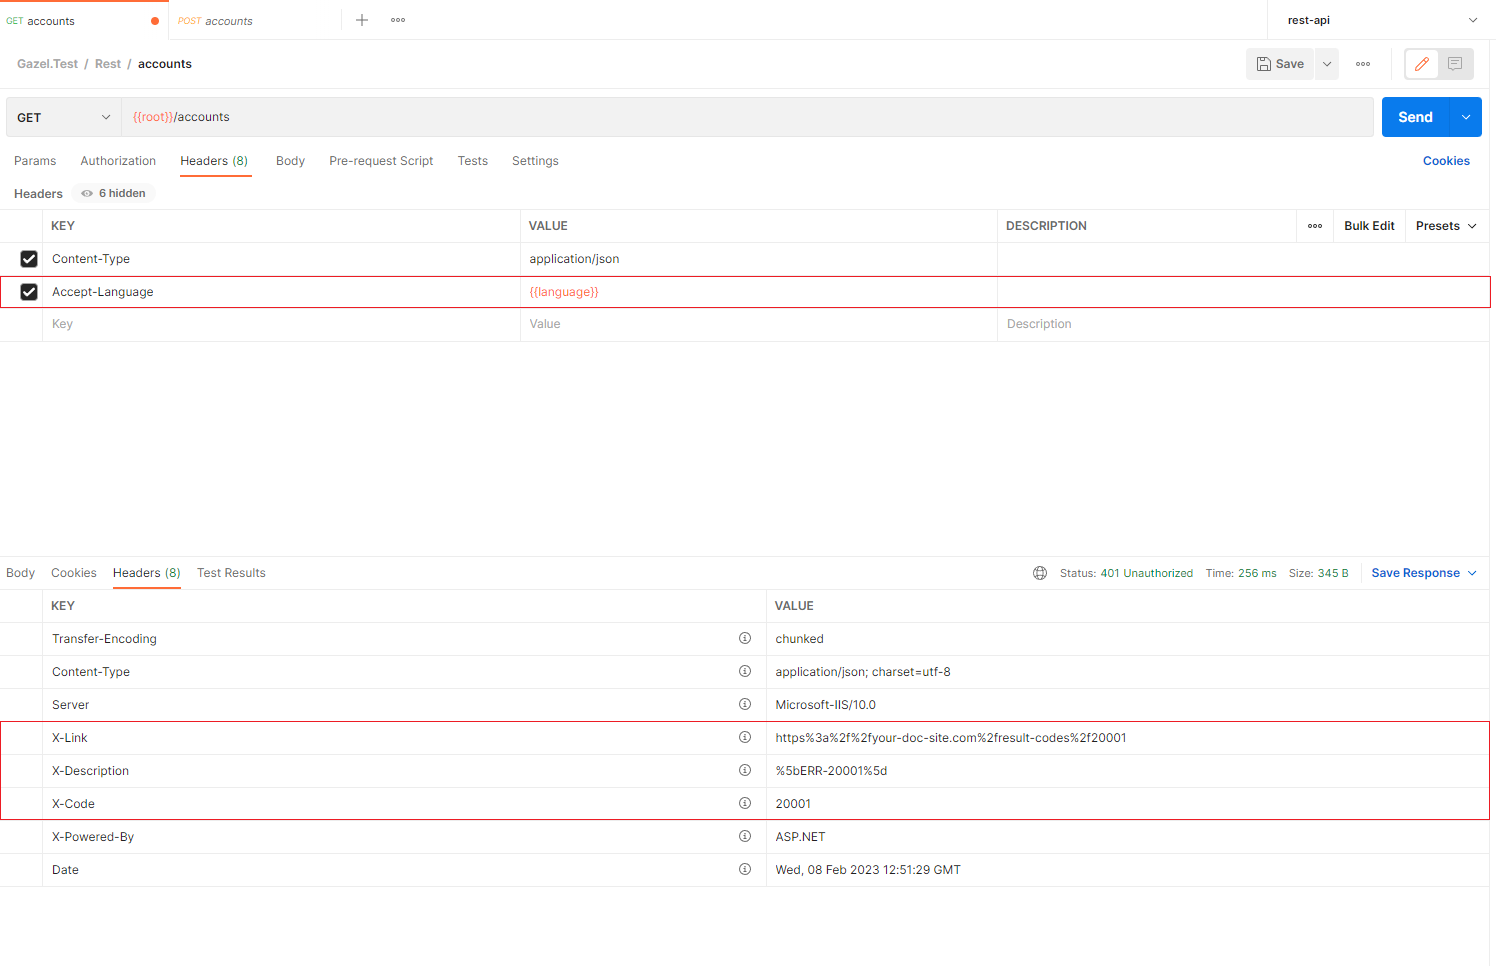
Configuration of this is as follows;
httpHeader: c => c.Custom(h => h .RequestHeader( publicHeaderName: "Accept-Language", internalHeader: Header.LanguageCode, conversionFunc: header => header.Before(",") ) // Result code and result message headers are added by default. // To override existing configuration, you need to clear response headers. .ClearResponseHeaders() .ResponseHeader( publicHeaderName: "X-Code", internalHeader: Header.ResultCode ) .ResponseHeader( publicHeaderName: "X-Description", internalHeader: Header.ResultMessage ) .ResponseHeader( publicHeaderName: "X-Link", internalHeader: Header.ResultCode, conversionFunc: header => header == "0" ? null : $"https://your-doc-site.com/result-codes/{header}" ))When header value is null, it will not be included in the response.
Rest Api
TBD
Service
You can configure service url base and request timeout values for a service application to let it consume its own services as follows;
service: c => c.Routine( serviceUrlBase: "http://localhost:5000/service", requestTimeout: TimeSpan.FromSeconds(5.0))You may use ServiceUrl helper to build a service url base;
// http://localhost:5000/serviceServiceUrl.Localhost(5000)// http://sample.inventiv.com.tr/serviceServiceUrl.Build("http://sample.inventiv.com.tr")Service Client
Service client configuration allows you to configure a downstream service application information;
serviceClient: c => c.Routine( serviceUrlBase: "http://localhost:5000/service" requestTimeout: TimeSpan.FromSeconds(5.0))You may use ServiceUrl helper to build a service url base;
// http://localhost:5000/serviceServiceUrl.Localhost(5000)// http://sample.inventiv.com.tr/serviceServiceUrl.Build("http://sample.inventiv.com.tr")Options
Options are features that you can only enable or disable. Below is a sample option configuration;
// e.g. Decimal point has built in Always or AfterTwoDigits configuration optionsdecimalPoint: c => c.Always()Decimal Point
Decimal point lets you change the way Money and MoneyRange value types are
serialized in service layer. It gives you two options Always and
AfterTwoDigits, default configuration is Always().
Use Always, when you always expect decimal point separator;
// While parsing, this option expects decimal point// only when there are decimal digits.// 100USD -> $100// 1.00USD -> $1.00decimalPoint: c => c.Always()Use AfterTwoDigits when you want last two digits to be treated automatically
as decimal digits;
// While parsing, this option treats last two digits// as decimal digits even if there is no decimal point// separator and expect decimal point separator only// when there are more than two decimal digits// 100USD -> $1.00// 1.001USD -> $1.001decimalPoint: c => c.AfterTwoDigits(),UTC
You can choose if ISystem.Now property will use UTC time or local time using
this option.
// Uses Utc timeutc: c => c.UseUtcTime()// Uses local timeutc: c => c.UseLocalTime()